Friday, December 30, 2011

Merry Christmas!

Just a quick post to wish everyone a Merry Christmas (last week) and a Happy New Year! I have enjoyed sharing recipes for a whole year, and look forward to sharing more in 2012.

On a kind of Christmasy note, here's what I brought for Christmas (along with scalloped potatoes)- this Rosemary Potato Olive Oil Bread. I just love it!!


Here are two of the Christmas gifts I requested, and my lovely husband bought for me. I know he doesn't mind spending money on cooking stuff for me, since I make so much good food for him! :)

This is my 4th (and probably last!) Cook's Illustrated cookbook. This one is 1000 pages long, and should keep me busy for years!


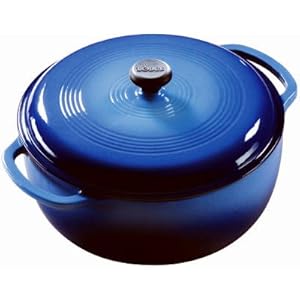
And then this beauty, a 6 quart Lodge dutch oven. Cast iron has really grown on me, and I'm excited to add this piece to my collection! As we speak, I'm braising a chicken breast in it. I've also used it for cooking chili. It's a really good size, and one unique thing about it is that it has a white interior- which makes it easy to see inside! The price is amazing, too, for what you get. A nice strong pot that should last years, and for under $50.


Anyway, thanks for reading!

Herb Focaccia Bread

I found this recipe a few months ago on my favorite blog (here), and it has become a favorite at our house! It has turned out well every time I've made it. We've had it as a side for Italian food, roast chicken, and more.

Brushing with olive oil before baking


All done & golden brown!


Herb Focaccia Bread
Printable version here

2 3/4 cups all-purpose flour
1 tsp. salt
1 tsp. sugar
2 1/2 tsp. instant yeast (or 1 packet)
1 large clove garlic, finely minced
3/4 tsp. dried rosemary (or 1 tbsp. fresh, chopped)
1/2 tsp. dried thyme (or 1/2 tbsp. fresh, chopped)
1/2 tsp. dried oregano
1/2 tsp. dried basil
1 tbsp. olive oil (plus more for topping)
1 cup warm water

1. In a large bowl (or the bowl of a stand mixer fitted with the paddle attachment), mix the flour, salt, sugar and yeast. Mix in the herbs. Add the garlic, water and olive oil and mix until the dough comes together. Switch to the dough hook if using, and knead for 4-6 minutes (adding additional flour only if necessary- the dough will get less sticky as it kneads). The dough should be soft and pliable but not overly stiff. Likewise, it shouldn't leave a lot of sticky dough residue on your fingers. The goal is a soft, supple dough.

2. Cover the bowl with lightly greased plastic wrap and let the dough rise for 30 minutes, until it is puffy. Gently deflate dough and allow to rest for 5 minutes.

3. Preheat the oven to 425º. Lightly grease a large, rimmed baking sheet and with your hands, spread the dough out into roughly an 8x10 inch rectangle. Use your knuckles or fingertips to make indentations over the dough, about every 1/2 inch. Lightly brush dough's surface with olive oil and bake for 15-20 minutes, until golden brown.

4. Immediately after removing from the oven, brush 1 more tablespoon olive oil over the bread, and sprinkle with about 1/2 tsp. salt. Cut into pieces and serve. Best when eaten the day it's made.

Why I love it? Mainly because it is delicious- the herbs and olive oil are fantastic together! It's a nice soft bread, and the steps are pretty simple. Plus, you just can't buy fresh, hot bread like this from a store!

Thursday, December 22, 2011

Christmas Goodies- Caramel Corn & Snickerdoodles

This week I made goodies for Dave to take to work, and his coworkers are requesting the recipes! One of the things in the bag was a pretzel wreath, which is posted below. The others were caramel corn and snickerdoodle cookies. The caramel corn was based off a recipe I found at allrecipes.com, and the cookies were from my Baking Illustrated cook book.


Caramel Corn
Printable version here

7 quarts plain popcorn (made from about 1 cup kernels)
1 cup (2 sticks) unsalted butter
1/2 cup light corn syrup
2 cups (14 oz.) light brown sugar
1 tsp. kosher salt (or 1/2 tsp. table salt)
1/2 tsp. baking soda
1 1/2 tsp. vanilla extract

1. Pop popcorn using your preferred method (here is mine). Place the popcorn in a large roasting pan (or two other large baking pans) and keep warm in a 225º oven.

2. Next, to make the caramel, melt the butter in a 3-quart saucepan set over medium heat. Once the butter is melted, mix in the corn syrup, brown sugar and salt. Increase the heat to medium-high and bring the mixture to a boil. Set a timer for 5 minutes, and keep the butter mixture at a boil, reducing the heat if necessary.

3. Remove the mixture from heat and stir in the baking soda and vanilla extract (this will make the mixture bubble up a little, so keep your hands away). Remove popcorn from the oven, and pour the caramel sauce over it, tossing to coat. Bake for 45 minutes to 1 hour (I did an hour), stirring every 15 minutes. The popcorn is done when it is completely crispy when you take a bite.

4. Line the countertop with waxed paper (I used one sheet of waxed paper, plus my pastry mat). Dump the corn out onto the paper and separate the pieces. Allow to cool completely, then store in airtight containers and/or resealable bags. Can be made several days in advance.


Snickerdoodles
Printable version here

2 1/4 cups (11 1/4 oz.) all-purpose flour
2 tsp. cream of tartar
1 tsp. baking soda
1/2 tsp. salt
12 tbsp. (1 1/2 sticks) unsalted butter, softened but still cool
1/4 cup vegetable shortening
1 1/2 cups (10 1/2 oz.) granulated sugar, plus 3 tbsp. for rolling dough
2 large eggs
1 tbsp. ground cinnamon for rolling dough

1. Preheat oven to 400º and line 2 large baking sheets with parchment paper or spray them with nonstick cooking spray. (I also lined one with plain foil, and it worked fine.)

2. Whisk the flour, cream of tartar, baking soda and salt together in a medium bowl; set aside.

3. With a mixer, cream the butter, shortening, and 1 1/2 cups sugar at medium speed until combined, 1 to 1 1/2 minutes. Scrape down the sides of the bowl with a rubber spatula. Add the eggs and beat until combined, about 30 seconds.

4. Add the dry ingredients and beat at low speed until just combined, about 20 seconds.

5. Mix 3 tbsp. sugar and 1 tbsp. cinnamon in a shallow bowl. Scoop the dough into balls, about 1 rounded tablespoon in size (I used a small cookie scoop) and round with your hands. Then roll each ball in the cinnamon/sugar mixture and place it on the baking sheet, spacing them about 2 inches apart. (Note- I found it easiest to roll a sheet or two full of the plain dough balls, then roll them all in cinnamon one at a time. That way my hands weren't getting quite so messy. Also, be sure to not place them too close on the baking sheet or they will run into each other, trust me! My medium baking sheet normally makes 12 cookies, and I could do 7 of these, and my large one that normally bakes 15 could do 9. I found out that chilling the dough beforehand makes them spread less, but either way is fine.)

6. Bake until the edges of the cookies are beginning to set and the centers are soft and puffy, 9 to 11 minutes (I do 9 1/2 minutes). Let the cookies cool on the baking sheets 2-3 minutes before transferring them to a wire rack. Cool completely, then store in an airtight container. Yield: about 4 dozen cookies.


Thursday, December 15, 2011

Pretzel Wreaths

I got this idea a few years ago when I was a Pampered Chef consultant. It looks neat and is SO easy! Which is good, because this time of the year, who has tons of time on their hands? Not me!


All it is is two staggered layers of 5 dipped pretzels, with sprinkles on top


You can also drizzle them with chocolate. This is how I packaged them to give away:


Pretzel Wreaths
Printable version here

Candy melts or almond bark*
Mini pretzels (10 per wreath)
Sprinkles

1. Place candy melts or almond bark in a microwave-safe dish; microwave according to package directions until melted & smooth.

2. Dip rounded bottoms of 5 miniature pretzels, one at a time, into bark; shake off excess. Lay pretzels onto parchment (or waxed) paper in a circular pattern with sides touching and rounded sides toward center.

3. Repeat with 5 additional pretzels, placing directly on top of first circle in a staggered circular pattern. Decorate wreath as desired. Let stand until set.

Store at room temperature in an airtight container up to 1 week. Do not refrigerate or freeze wreaths or pretzels will lose crispness.

*The amount of candy melts depends on how many wreaths you want to make. You can also substitute regular chocolate chips, melted and mixed with a little vegetable shortening (the ratio I found online was 8 oz. chips to 1 tbsp. shortening).

Why I love it? They are so quick to make- especially if you make them on a lined cookie sheet, and put it in the fridge for a few minutes. I think one of them makes a nice little gift for the holidays.

Tuesday, December 6, 2011

Rosemary Potato Olive Oil Bread

I tried a new recipe at dinnertime last night. For some reason this sounded really good- Rosemary Potato Olive Oil Bread. I've never had it before, but I was pretty sure it would be good! I searched Google and found this recipe here- it's a blog written by someone named Megan.

(Side note- here's my cutie Megan wearing an apron I just made her. She'll be 3 next week!)


Anyway, this bread wasn't hard to make, and it turned out great! All five of us devoured it! I'm going to write the recipe exactly as I made it, but you can also look at the post I found it from, or this site (the original source for the recipe) for more explanation.

*I just made it again, and found two things to add. One is the time it takes to make this- not counting the time to make the mashed potato, it takes 2 1/2 hours start to finish. Plus, you would need to add about 1/2 hour of cooling time. I thought I started this early enough in the afternoon, but it ended up being ready a little too late for dinner. So for me, I'd want to start it around 2:30 to have ready for dinner at 5:30.

Also, I found that it is still good the next day. I didn't mean to do this, but I baked it on Friday and we ate it for dinner on Saturday. After it cooled, I stored it in a paper bag (I'm sure plastic would be fine too). Then when I wanted to eat it the next day, I heated in on the oven rack at 300 degrees for maybe 10 minutes. It tasted exactly like it did the first time! I didn't mean to do it that way, but it's good to know! :) The leftovers also make great toast!

Mashed potato & olive oil mixture


Rosemary Potato Olive Oil Bread
Printable version here

1/2 cup mashed up potato
2 tbsp. olive oil
1 1/3 cup all-purpose flour (or bread flour)
2/3 cup wheat flour
1 tsp. salt
1 1/8 tsp. instant dry yeast (half a package)
1 tsp. dried rosemary, chopped
1/2 cup potato water (or regular water), warm

1. In a small bowl, mix together the potatoes and olive oil until smooth. Set aside.

2. In the bowl of a stand mixer (or a large bowl), combine all dry ingredients. Next add the potato mixture and the warm water; stir. Knead on speed 2 (or by hand) for 8 minutes, or until smooth and elastic, adding small amounts of water or flour if needed to form a soft dough (mine didn't need any extra).

3. Place dough in a large, lightly oiled bowl and cover with a dishtowel. Let rise for 1 hour or until doubled in size. (I turn my oven on for a minute or two while the dough is kneading, then I have a slightly warm place for the dough to rise in.)

4. Turn dough out onto a lightly floured surface and knead a few times. Form into a ball, pulling the dough to the underside of the ball to help form a smooth top. Pinch the dough closed on the bottom. Place the dough on a lightly greased baking sheet & sprinkle lightly with flour. Cover with a towel and let rise for 30 minutes, or until doubled in size.

5. Toward the end of the rising time, preheat the oven to 400º. If the dough was in a bowl, flip it right-side up on the baking sheet, greased or lined with parchment. Using a sharp knife, make 3-4 diagonal slits in the bread to make a criss-cross pattern (or two slits to make an X). Bake for 30-35 minutes or until golden brown. Transfer to a wire rack to cool. Let cool (at least slightly) before slicing.

Yield: One medium loaf
  • For the potato, I used one Yukon gold. I peeled & cubed it, and cooked it in a medium saucepan with enough water to cover it. Once it was soft, I drained it, saving the liquid. Then I mashed the potato until it was completely smooth.
  • You could use all white flour, I just chose to use part white/part wheat.
  • Feel free to use fresh rosemary if you have it.
  • You can also double the ingredients to make a larger loaf. When I did that, I made it in a rounded rectangular shape with 3 X's on top.
Why I love it? It is so soft and flavorful! It smells amazing, too! It would be a perfect accompaniment to just about any meal.

Wednesday, November 23, 2011

Easy Popcorn

I found a recipe on a blog recently (here) that just blew my mind. It said you can cook popcorn in a paper bag in the microwave, with nothing but kernels in the bag- and it would turn into popcorn. I found that hard to believe. If it was true, why were there so many kinds of popcorn in little plastic-wrapped packages? I've also seen microwaveable popcorn makers, and had been thinking of buying one of them. Surely you need some kind of special equipment...

So, with much disbelief, I tried it last week- and it WORKED! Seriously, no one ever told me making popcorn could be that easy! I bought a pack of brown lunch bags from the dollar store, and plain popcorn kernels from the bulk section at WinCo. Look how easy this is!

These are all the ingredients


Put kernels in a bag and fold top over 3 times


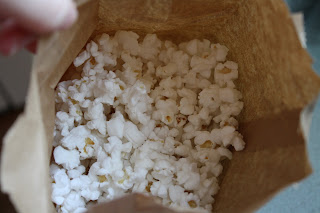
2-3 minutes later, this is what you have!


Put in a bowl, drizzle with butter, sprinkle with salt.


Easy Popcorn

Printable version here

1/4 to 1/3 cup popcorn kernels
1 brown paper lunch bag
Melted butter (about 1 tbsp.), salt, and/or any other toppings

1. Pour the kernels into the brown paper bag. Tightly fold over the top three or four times. No tape or staples are necessary.

2. Put it in the microwave and start it on high for 3 minutes. Listen for the popping to slow down to 3 or 4 seconds apart at which point you will take it out of the microwave.

3. Pour popcorn into a bowl and drizzle with melted butter or spritz with olive oil and then sprinkle with salt. (If you don’t use oil or butter the salt won’t stick.)

Yield: Approximately 3 – 4 servings

Why I love it? It's a quick snack that costs only pennies to make, it makes hardly any dirty dishes, and it's good for you- so much more so than the packaged popcorn!

Tuesday, November 15, 2011

Thanksgiving Recipes

With Thanksgiving quickly approaching, I thought I'd share some of my past posts on Thanksgiving-related foods. Enjoy!

Pumpkin Trifle


Pumpkin Roll (what I brought last year)


Sweet Potato Casserole (what I'm bringing this year!)


After Thanksgiving Turkey Soup

Monday, November 14, 2011

Buttermilk Dinner Rolls

Today I looked online for a new roll recipe (as if I don't already have more recipes than I need...) and found this one. I found it here at Mel's Kitchen Cafe. I cut her recipe in half (the original recipe calls for 8 cups of flour), and it made enough for 2 dinner's worth- about 20 rolls. We had half for dinner, and I stuck the rest in the fridge (unbaked) for later.

Cut the dough into wedges, then roll up into a crescent shape


On a greased baking sheet, ready to rise


All finished!


Buttermilk Dinner Rolls
Printable version here

Yield: 20 rolls

1 1/2 cups buttermilk at room temperature
3.5-4 cups flour, divided
1/2 tbsp. yeast dissolved in 2 tbsp. warm water (let it proof for 2-3 minutes)
1/4 cup sugar
1 egg, lightly beaten (I forgot to add this and they were fine)
1 tsp. salt
1/4 cup oil
1/2 tsp. baking soda

1. Mix the buttermilk, 1 1/2 cups flour, and yeast/water mixture together thoroughly in a large mixing bowl. Let stand at room temperature until double in size, about 2 hours (mine took 1 1/2 hours).

2. To this mixture, add sugar, eggs, salt, 2 1/4 cups flour (I did 1 1/2 cups wheat flour & 3/4 cup all-purpose), and baking soda. Mix well and knead for 7-10 minutes. Add more flour a tablespoon at a time if the dough is really sticky.

3. Divide dough into two halves. On a pastry mat (or a lightly floured countertop/cutting board), roll out each half into a flat disc, about 10 inches across and 1/4" thick. Cut into 9-10 wedges. Roll into a crescent shape and place on a lightly greased baking sheet. Cover loosely with plastic wrap (that has been sprayed with nonstick spray), and let rise for 1 hour or until doubled. Repeat with the 2nd disc of dough.

4. Bake at 350º for 12 minutes, or until lightly browned. Brush with melted butter if desired.

*Optional- you can put some of this dough in the fridge for up to 1 week, and bake it later. I baked one pan of rolls the first night, and put the rest of them (shaped, covered with plastic wrap) in the fridge. To bake later, I'll just need to let them rest on the counter until doubled, about 2 hours, then bake.

Why I love it? They're just nice, soft rolls, and they weren't hard to make. The kids practically fought over who got the last one! They were good dipped in beef stew, and it was also delicious topped with apple butter.

Beef Stew

I have been cooking up a storm lately, but between housework & homeschooling, my blog time has been limited... I'll try to get a few up tonight though. I have a lot of posts that are about half done.

This is what I made for tonight's dinner. Everyone ate it & loved it, and I even have a little left over for tomorrow! I've made this beef stew many times. Like all crock pot meals, it was so nice to prep it in the morning, and have my afternoon be not so crazy! That gave me more time to make the rolls I served with this.


The prepped vegetables (next time I think I'll add more carrots)


Searing the flour-coated beef chunks before putting them in the crock pot (optional)


Beef Stew
Printable version here

1 pound cubed beef
1/4 cup flour
1 tsp. salt
1/4 tsp. pepper
1/2 tsp. paprika

2 cups beef broth (or one can)
1/2 tsp. Worcestershire sauce
1 clove garlic, minced
1 bay leaf (optional)
2 carrots, peeled and diced into 1/2" slices
1/2 onion, diced
1 rib celery, diced into 1/2" slices
2 Yukon potatoes, diced into 1/2" cubes

1. Combine beef, flour, salt, pepper & paprika in a large Ziploc bag; shake to coat meat. Place into crock pot. (Optional- heat a skillet over medium heat, add enough oil to coat the pan, and add flour-coated beef. Brown on all sides, then add broth. Stir, bring to a simmer, then carefully pour into crock pot.)

2. Add all remaining ingredients to crock pot. Cook on low for about 6-7 hours or until done. Remove bay leaf, and serve. Serves 4.

*Note- supposedly searing the meat before putting it in the crock pot helps to add flavor. I've done it both ways, and I can't really tell a difference... next time I'll probably go back to putting it straight into the crock pot, without searing first.

Why I love it? Well it's not fancy, but it is yummy, hearty, and my favorite version of beef stew. It's a good all-in-one meal. You can add bread and/or salad, but for the most part, there's not much you need to do when it comes to serving time.

Wednesday, November 2, 2011

Oatmeal Pancake Mix

This recipe has the potential to change breakfast time around here- it is the fastest warm, homemade breakfast I think I've ever made! I found this on a blog (here), and have made it several times this week.

What you do is make a dry pancake mix, then when you want to make the pancakes, mix together one cup of the mix with a cup of buttermilk and one egg. That's it! Cook on a griddle, and you have a healthy breakfast that everyone will eat!


Oatmeal Pancake Mix
Printable version here

* Makes 10 cups of dry mix

3 1/2 cups quick oats
5 cups whole wheat flour (or half wheat, half white)
3 tbsp. sugar
3 tbsp. baking powder
1 tbsp. salt
1 tbsp. baking soda
1 cup vegetable oil

1. Grind the oats in a blender (what I used) or a food processor until powdery. Place oats and all dry ingredients in a mixer or large bowl, and stir to combine.

2. With mixer on slow speed (or gently by hand), drizzle the vegetable oil into the bowl slowly while the mixer is running. When all the oil has been added, stop the mixer and squeeze a clump of mix into your hand. If it stays together, it is just right. If it is still crumbly, add another tablespoon of oil at a time until the consistency is correct (you probably won't have to do this).

Storage info: Store in an airtight container for up to two weeks at room temperature or indefinitely in the refrigerator or freezer. Feel free to make a half batch if you'd like- that's what I did the first time.

Cooking info: Whisk together 1 cup of mix, 1 cup buttermilk (or half plain yogurt and half milk), and 1 egg. Heat a griddle and drop the batter onto it. Cook on both sides until done. This much makes about 10 to 12 3-inch pancakes.

Why I love it? I always have these ingredients, it is SO EASY to keep this on hand and mix up a batch, and the kids and I love them! They're so much healthier than regular white pancakes- they're whole grain and have fiber, but they still taste every bit as good!

Tuesday, October 25, 2011

Blog Update

It's been just over a year since I started this blog. It seemed like a good idea when I started it, and I have enjoyed it even more than I expected! Since the blog just keeps getting bigger, I knew that it needed some new organization. My lovely husband helped me create the new tabs at the top. My favorite part is the Recipe Index- old posts are so much easier to find now!

Thanks to everyone who reads this blog, and to those who comment. I really enjoy sharing recipes with you, and it gives me good motivation to keep cooking! :)

Feel free to mention any other suggestions you have for the blog. I want to make it as user-friendly as possible!

Friday, October 21, 2011

Crockpot Roasted Chicken

Growing up, my definition of chicken was boneless, skinless chicken breasts. They're cheap, healthy, and easy to use. In the past year or so I've tried out recipes using other cuts of chicken, too, and have found that there are advantages to them as well.

One of these is a whole chicken. I stocked up recently when they were on sale for 79 cents/lb, making a whole chicken about $3.50. For that price I can get two dinner's worth of meat, plus a few quarts of broth.

I found this recipe on a website called www.100daysofrealfood.com. (They have tons of good, wholesome recipes) It is such an easy way to cook a whole chicken. When I make it, I use half of the meat that night, and half for another dinner. The possibilities for the cooked chicken are endless- you can eat it as-is (just cut into pieces and serve with sides), in soups, casseroles, chicken salad, etc.

Here's the gist of the recipe:

Make a spice rub


Put sliced onions in the bottom of the crockpot, place chicken in, cover with rub


Put lid on, cook on high for 4 hours, and it's done!


Does it get much easier than that?? I use a strong wooden spoon to get the chicken out- I put it in the cavity of the chicken, hold it upright to drain the liquid, then transfer it to a baking sheet (so it could cool a little, and the juices won't run all over). Then I peel the skin off, and cut it up however I'd like. I then make chicken stock with the leftover ingredients- the link above gives directions for that.

Crockpot Roasted Chicken
Printable version here

2 teaspoons paprika
1 teaspoon salt
1 teaspoon onion powder
1 teaspoon thyme
½ teaspoon garlic powder
¼ teaspoon cayenne (red) pepper
¼ teaspoon black pepper
1 onion
1 large chicken

1. Combine the dried spices in a small bowl.

2. Loosely chop the onion and place it in the bottom of the slow cooker. Remove any giblets from the chicken and then rub the spice mixture all over. You can even put some of the spices inside the cavity and under the skin covering the breasts. Put prepared chicken on top of the onions in the slow cooker, cover it, and turn it on to high. (Or, you can put the chicken in the crockpot, then cover with the spice mix) There is no need to add any liquid.

3. Cook on high for 4 – 5 hours (for a 3 or 4 pound chicken) or until the chicken is falling off the bone. (My chicken was about 3 pounds and was perfect in 4 hours) Enjoy!

Why I love it? It is very easy- really! I was scared of cooking with whole chickens before finding this recipe. Now, I stock up when I find them on sale, just so I can make this. Like I said, I get two dinner's worth of cooked chicken plus a good amount of stock out of this. It would also be a good recipe to make in the summer when you want shredded chicken, but don't want to turn on the oven.

Tuesday, October 18, 2011

Blog Recommendation

There are so many cooking blogs out there now, but it's kind of hard to find them- it's not like there's a master list of blogs. So, when I stumble across a good one, it's pretty exciting!

I found one a few months ago that I love. The things she posts are, for the most part, the same type of foods that I like to make. She's a mom of 4 little boys, and she likes to cook from scratch. She's also a fan of Cook's Illustrated recipes, like me! The recipes I've tried from there have all been great, and there's such a good selection.

So, go check out her blog, I'm sure you'll like it!

Mel's Kitchen Cafe

Delicious Ham & Potato Soup

Recently I searched allrecipes.com for a new ham & potato soup recipe, as I didn't have one that I loved. The one I found had a 5 star rating with over 5300 reviews- so I figured it had to be good! It was! I've made it twice in the past week (since we loved it and I still had most of the ingredients on hand).

Including chopping the vegetables, it takes about 45 minutes to make. It serves about 6, and the leftovers are good, too. Basically, you cook the ham & vegetables in a pot of water, and in a separate pot you make a creamy milk sauce. Mix the two together and you're done!


(Original recipe from here)

Delicious Ham and Potato Soup
Printable version here

3 1/2 cups diced potatoes (peeled if desired)
1/2 cup diced celery
1/3 cup finely chopped onion
1 cup diced cooked ham
3 cups water
1 tbsp. chicken bouillon
1/2 tsp. each salt & pepper, or to taste
3 tbsp. butter
3 tbsp. flour
2 cups milk, warmed

1. Combine the potatoes, celery, onion, ham, water, bouillon, salt and pepper in a large pot. Bring to a gentle boil, then simmer for 10-15 minutes or until potatoes are tender.

2. Once you turn on the pot to boil, start making the sauce in a separate saucepan. Melt butter over medium-low heat, then whisk in the flour. Cook, stirring constantly, for about 1 minute. Slowly whisk in the milk. Bring it to a simmer, stirring often, then cook for a few more minutes until thickened.

3. Stir the milk mixture into the potato mixture, season to taste, and serve. Top with grated cheese, if desired. Enjoy!

Notes
- Feel free to add more or less of the vegetables; this is just the amount I like
- You could substitute the water & bouillon for chicken broth
- I slightly peel the potatoes, just while I'm cutting them. I slice off the ends and part of the flat surface, which leaves us with about half the peel still attached.

Why I love it? It's relatively quick to make, easy (and doesn't require any specialized kitchen equipment- just a cutting board, knife, and 2 pots!), inexpensive, pretty healthy (the thickened milk is a lot healthier than adding cream), and it's just delicious! It's so creamy, and all the tastes are perfectly balanced. I wouldn't mind making this over & over all winter!

Monday, October 10, 2011

Buttermilk Blueberry Coffee Cake

The other day I was trying to find a use for my buttermilk before it went bad, and I found this recipe by searching allrecipes.com. It had great reviews, and it did not disappoint! I reduced the amount of sugar a little bit. I will definitely make this one again- maybe even tomorrow!


Buttermilk Blueberry Coffee Cake
Printable version here

1/4 cup butter, softened
1/2 cup white sugar
1 egg
1/2 tsp. vanilla extract
2 cups all-purpose flour
1 1/2 tsp. baking powder
1/2 tsp. baking soda
1/2 tsp. salt
1 cup buttermilk
1 cup blueberries (fresh or frozen)

Topping
1/4 cup all-purpose flour
1/4 cup white sugar
2 to 3 tbsp. butter

1. Preheat oven to 350º. Grease and flour an 8x8 inch pan (or a 9-inch round pan); set aside.

2. In a large bowl, cream together 1/4 cup butter and 1/2 cup sugar until light and fluffy. Beat in the egg, followed by the vanilla.

3. Stir together the flour, baking powder, baking soda, and salt. Beat in the flour mixture alternately with the buttermilk, mixing just until incorporated. Stir in blueberries. Pour batter into prepared pan.

4. In a small bowl (or food processor), combine remaining flour and sugar. Cut in butter until mixture resembles coarse crumbs. Sprinkle on top of batter.

5. Bake for 55 minutes, or until a toothpick inserted into the center of the cake comes out clean. Set pan on a wire rack to cool. Covered with plastic wrap, this stays fresh for several days. Reheat leftovers if desired.

Why I love it? It's fairly easy, and I normally have the ingredients on-hand. The kids and I all loved it (except for my picky eater, who said it wasn't good, even though he didn't even try a bite!). It's not too bad health-wise, for a breakfast cake! It's just soft, tasty, and I like the slight tang from the buttermilk.

Wednesday, October 5, 2011

White Chocolate Sauce (& Mocha)

Recently I started using my espresso machine again, after not for a few years. My days with homeschooling the 3 kids are long and often challenging, so if I want to reward myself with a coffee drink to start the day, I think that's fine. :)

I found this recipe online- it only takes 3 ingredients, and about 3 minutes! (Hey, and about $3!) Nutrition-wise, well, it's not great, but it is a treat! I promise you'll like this one.

Added the white chocolate chips to heated sweetened condensed milk


The finished sauce- it's pretty thick


White Chocolate Sauce
Printable version here

1 can (14 oz.) sweetened condensed milk
12 oz. white chocolate chips
1 tbsp. pure vanilla extract

Warm the milk in a saucepan over medium heat, stirring occasionally. When warm, add white chocolate. Turn off heat and whisk until pieces are melted. Add vanilla and stir.

Store in an airtight container in the fridge. This will last for several weeks.

Note: this will harden in the fridge. If you're using in a hot drink, just add a scoop of the sauce to your mug, and add the liquid. It'll melt when you stir the drink. If you want to use it as a sauce (like over a dessert), put a portion of it in a microwave-safe container and heat until it's warm/melted.

White Mocha: Combine 2 oz freshly brewed espresso, 1/2 cup steamed milk, and 1 tbsp. (or to taste) of the white chocolate sauce. Stir, add whipped cream if desired, and enjoy!

Why I love it? It's DELICIOUS, that's why! :) It's also cheaper to make it than to buy it. The ingredients cost me $3.50 at WalMart. I made a half batch this time (so $1.75) and there's enough to last me a while. With my favorite white chocolate mocha costing $3.75 at Starbucks, this is a pretty good money saver.

Thursday, September 29, 2011

Sugar Cookies

Recently I tried out a new sugar cookie recipe, and I was really happy with how it turned out! The cookie recipe is from OurBestBites website- they have tons of good recipes!!

As far as the frosting goes, I never measure when I'm making a cookie frosting- I basically put powdered sugar in a bowl, add milk a little bit at a time, stir, add food coloring, and sometimes I add a little (maybe 1/2 tablespoon) corn syrup to help it be a little glossy. Just stir and add things (either sugar or milk) until it gets the consistency you're looking for. After frosting, it sets up pretty quickly, so I am able to stack the cookies.

Update 12/11- I made a half batch (again), and it made 20 small/medium sized cookies. This was what we made:


Sugar Cookies (Our Best Bites)
Printable version here

1 cup butter (no substitutions), softened
1 cup sugar
1 egg
1 1/2 tsp. almond extract (or vanilla)
3 cups flour
1 1/2 tsp. baking powder
1/2 tsp. salt

1. Cream butter and sugar until light and fluffy, about 2 minutes. Add egg & extract and stir until combined.

2. Combine the dry ingredients in a separate bowl. Slowly add to the butter mixture; mix until combined.

3. Divide the dough into two halves, and put each one on a sheet of waxed paper or plastic wrap. Flatten it so it's about the shape of a frisbee, then wrap it all the way. Place in the fridge for 1-2 hours (or less in the freezer). Your dough should be well-chilled so it can be rolled & cut out easier. (You can also make the dough several days in advance, and keep in the fridge.)

4. Remove from fridge, and roll out on either a pastry mat or a surface that has been lightly sprinkled with flour. Roll out to about 1/4" thick then cut. Place cookies on a cookie sheet (I always use parchment on my sheets), then bake at 350º for 8-12 minutes (I did 10). The baking time depends on the size of your cookies, plus how soft or crispy you like them. Remove onto cooling racks and let cool completely. Frost if desired.

Why I love it? The recipe is easy (I made a half batch, because I didn't need a ton of cookies), and they turn out delicious. Exactly how sugar cookies are supposed to taste!

Tuesday, September 20, 2011

How to Slice Bread

I've had people ask me how I get bread sliced so nicely, so I thought I'd try to explain it. I think it's combination of a few things- using a good recipe (this bread has a good consistency- not too dense or too soft), I wait until it's all or mostly cool before slicing it, and I use a middle-of-the-road serrated bread knife.

I had my son take this picture the other day when I was slicing bread. I hold onto the end of the loaf with a few fingers while I'm slicing that piece; I think it helps me to cut it straighter. I cut one slice at a time, then make a stack of the cut pieces. I store them in a bread container in stacks like this (with maybe 5-6 slices in each stack). That way the bread doesn't lean & fall over when it's stored- that used to bug me.


That is this whole wheat bread recipe, my favorite one!

Monday, September 19, 2011

Grandma's Spaghetti Sauce

I've been so busy lately with stocking up the freezer (for back-to-school time) and canning, that's why the blog has been a little slow. But this recipe's worth the wait, trust me!

This recipe is my Grandma's spaghetti sauce recipe. She wasn't Italian, but she was married to my Sicilian grandfather, and cooked daily for her family of 7. Some of my best memories of her are related to the kitchen. Her small kitchen (with a plaque that said "Marilyn's Kitchen"), her aprons, her cooking huge pots of spaghetti, and her kitchen being full of homemade pizza every Christmas Eve. I love her & miss her so much!

Here's the recipe in her handwriting


Yum, so meaty & thick!


This is at the end, after simmering. You can see how it has reduced quite a bit.


Grandma's Spaghetti Sauce
Printable version here

2 large cans (12 oz. each) tomato paste
1 lb. ground beef
1 lb. Italian sausage
1 onion, chopped
1 tsp. minced garlic (a few cloves)
2 tbsp. Italian seasoning
Half of 1/3 cup sugar

*Make the day ahead for best flavor

In a large pot (6-8 quart), brown beef, sausage, and onion. Drain grease. Add tomato paste and 9 cups water. Bring to a boil, lower heat, and simmer for about 4 hours. While cooking, add salt, pepper, garlic, and Italian seasoning. Add sugar during the last hour. Taste, and add salt if it still needs something. Cool, then store. May be frozen in dinner-sized portions. Enjoy!

(Note- this is half the amount of the original recipe. If you'd like, and if you have gigantic pots, you may double the recipe.)

Why I love it? Well, it's 50/50- I love it because it's nostalgic and because it's delicious! Sauce from a jar just can't compare. It makes a lot, it's freezable, and we all love it!