Wednesday, November 23, 2011

Easy Popcorn

I found a recipe on a blog recently (here) that just blew my mind. It said you can cook popcorn in a paper bag in the microwave, with nothing but kernels in the bag- and it would turn into popcorn. I found that hard to believe. If it was true, why were there so many kinds of popcorn in little plastic-wrapped packages? I've also seen microwaveable popcorn makers, and had been thinking of buying one of them. Surely you need some kind of special equipment...

So, with much disbelief, I tried it last week- and it WORKED! Seriously, no one ever told me making popcorn could be that easy! I bought a pack of brown lunch bags from the dollar store, and plain popcorn kernels from the bulk section at WinCo. Look how easy this is!

These are all the ingredients


Put kernels in a bag and fold top over 3 times


2-3 minutes later, this is what you have!
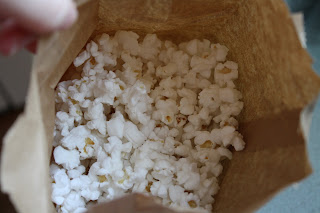

Put in a bowl, drizzle with butter, sprinkle with salt.


Easy Popcorn

Printable version here

1/4 to 1/3 cup popcorn kernels
1 brown paper lunch bag
Melted butter (about 1 tbsp.), salt, and/or any other toppings

1. Pour the kernels into the brown paper bag. Tightly fold over the top three or four times. No tape or staples are necessary.

2. Put it in the microwave and start it on high for 3 minutes. Listen for the popping to slow down to 3 or 4 seconds apart at which point you will take it out of the microwave.

3. Pour popcorn into a bowl and drizzle with melted butter or spritz with olive oil and then sprinkle with salt. (If you don’t use oil or butter the salt won’t stick.)

Yield: Approximately 3 – 4 servings

Why I love it? It's a quick snack that costs only pennies to make, it makes hardly any dirty dishes, and it's good for you- so much more so than the packaged popcorn!

Tuesday, November 15, 2011

Thanksgiving Recipes

With Thanksgiving quickly approaching, I thought I'd share some of my past posts on Thanksgiving-related foods. Enjoy!

Pumpkin Trifle


Pumpkin Roll (what I brought last year)


Sweet Potato Casserole (what I'm bringing this year!)


After Thanksgiving Turkey Soup

Monday, November 14, 2011

Buttermilk Dinner Rolls

Today I looked online for a new roll recipe (as if I don't already have more recipes than I need...) and found this one. I found it here at Mel's Kitchen Cafe. I cut her recipe in half (the original recipe calls for 8 cups of flour), and it made enough for 2 dinner's worth- about 20 rolls. We had half for dinner, and I stuck the rest in the fridge (unbaked) for later.

Cut the dough into wedges, then roll up into a crescent shape


On a greased baking sheet, ready to rise


All finished!


Buttermilk Dinner Rolls
Printable version here

Yield: 20 rolls

1 1/2 cups buttermilk at room temperature
3.5-4 cups flour, divided
1/2 tbsp. yeast dissolved in 2 tbsp. warm water (let it proof for 2-3 minutes)
1/4 cup sugar
1 egg, lightly beaten (I forgot to add this and they were fine)
1 tsp. salt
1/4 cup oil
1/2 tsp. baking soda

1. Mix the buttermilk, 1 1/2 cups flour, and yeast/water mixture together thoroughly in a large mixing bowl. Let stand at room temperature until double in size, about 2 hours (mine took 1 1/2 hours).

2. To this mixture, add sugar, eggs, salt, 2 1/4 cups flour (I did 1 1/2 cups wheat flour & 3/4 cup all-purpose), and baking soda. Mix well and knead for 7-10 minutes. Add more flour a tablespoon at a time if the dough is really sticky.

3. Divide dough into two halves. On a pastry mat (or a lightly floured countertop/cutting board), roll out each half into a flat disc, about 10 inches across and 1/4" thick. Cut into 9-10 wedges. Roll into a crescent shape and place on a lightly greased baking sheet. Cover loosely with plastic wrap (that has been sprayed with nonstick spray), and let rise for 1 hour or until doubled. Repeat with the 2nd disc of dough.

4. Bake at 350ยบ for 12 minutes, or until lightly browned. Brush with melted butter if desired.

*Optional- you can put some of this dough in the fridge for up to 1 week, and bake it later. I baked one pan of rolls the first night, and put the rest of them (shaped, covered with plastic wrap) in the fridge. To bake later, I'll just need to let them rest on the counter until doubled, about 2 hours, then bake.

Why I love it? They're just nice, soft rolls, and they weren't hard to make. The kids practically fought over who got the last one! They were good dipped in beef stew, and it was also delicious topped with apple butter.

Beef Stew

I have been cooking up a storm lately, but between housework & homeschooling, my blog time has been limited... I'll try to get a few up tonight though. I have a lot of posts that are about half done.

This is what I made for tonight's dinner. Everyone ate it & loved it, and I even have a little left over for tomorrow! I've made this beef stew many times. Like all crock pot meals, it was so nice to prep it in the morning, and have my afternoon be not so crazy! That gave me more time to make the rolls I served with this.


The prepped vegetables (next time I think I'll add more carrots)


Searing the flour-coated beef chunks before putting them in the crock pot (optional)


Beef Stew
Printable version here

1 pound cubed beef
1/4 cup flour
1 tsp. salt
1/4 tsp. pepper
1/2 tsp. paprika

2 cups beef broth (or one can)
1/2 tsp. Worcestershire sauce
1 clove garlic, minced
1 bay leaf (optional)
2 carrots, peeled and diced into 1/2" slices
1/2 onion, diced
1 rib celery, diced into 1/2" slices
2 Yukon potatoes, diced into 1/2" cubes

1. Combine beef, flour, salt, pepper & paprika in a large Ziploc bag; shake to coat meat. Place into crock pot. (Optional- heat a skillet over medium heat, add enough oil to coat the pan, and add flour-coated beef. Brown on all sides, then add broth. Stir, bring to a simmer, then carefully pour into crock pot.)

2. Add all remaining ingredients to crock pot. Cook on low for about 6-7 hours or until done. Remove bay leaf, and serve. Serves 4.

*Note- supposedly searing the meat before putting it in the crock pot helps to add flavor. I've done it both ways, and I can't really tell a difference... next time I'll probably go back to putting it straight into the crock pot, without searing first.

Why I love it? Well it's not fancy, but it is yummy, hearty, and my favorite version of beef stew. It's a good all-in-one meal. You can add bread and/or salad, but for the most part, there's not much you need to do when it comes to serving time.

Wednesday, November 2, 2011

Oatmeal Pancake Mix

This recipe has the potential to change breakfast time around here- it is the fastest warm, homemade breakfast I think I've ever made! I found this on a blog (here), and have made it several times this week.

What you do is make a dry pancake mix, then when you want to make the pancakes, mix together one cup of the mix with a cup of buttermilk and one egg. That's it! Cook on a griddle, and you have a healthy breakfast that everyone will eat!


Oatmeal Pancake Mix
Printable version here

* Makes 10 cups of dry mix

3 1/2 cups quick oats
5 cups whole wheat flour (or half wheat, half white)
3 tbsp. sugar
3 tbsp. baking powder
1 tbsp. salt
1 tbsp. baking soda
1 cup vegetable oil

1. Grind the oats in a blender (what I used) or a food processor until powdery. Place oats and all dry ingredients in a mixer or large bowl, and stir to combine.

2. With mixer on slow speed (or gently by hand), drizzle the vegetable oil into the bowl slowly while the mixer is running. When all the oil has been added, stop the mixer and squeeze a clump of mix into your hand. If it stays together, it is just right. If it is still crumbly, add another tablespoon of oil at a time until the consistency is correct (you probably won't have to do this).

Storage info: Store in an airtight container for up to two weeks at room temperature or indefinitely in the refrigerator or freezer. Feel free to make a half batch if you'd like- that's what I did the first time.

Cooking info: Whisk together 1 cup of mix, 1 cup buttermilk (or half plain yogurt and half milk), and 1 egg. Heat a griddle and drop the batter onto it. Cook on both sides until done. This much makes about 10 to 12 3-inch pancakes.

Why I love it? I always have these ingredients, it is SO EASY to keep this on hand and mix up a batch, and the kids and I love them! They're so much healthier than regular white pancakes- they're whole grain and have fiber, but they still taste every bit as good!