Thursday, October 4, 2012

Banana Muffins


So... I have an addiction that I think many of you might understand!

That addiction is... searching for new recipes!  Not a big surprise, huh?  I already have enough recipes to probably make something different each day of the year, yet I still can't stop looking.  This recipe is one example of why!  I have so many muffin recipes, but when I saw this one recommended online, I had to give it a try.

We are hooked on it!  It uses no fancy ingredients or equipment, yet the muffins come out fabulous!!  They are so flavorful and so soft.  The author of the blog where I found this recipe says that they taste even better the next day- that is, assuming you have any left!

One tip I have for this recipe is about how I mash bananas.  Last year for my birthday I asked for a potato ricer (it makes great mashed potatoes), and I found it also works great for mashing bananas!  This is the one I have.
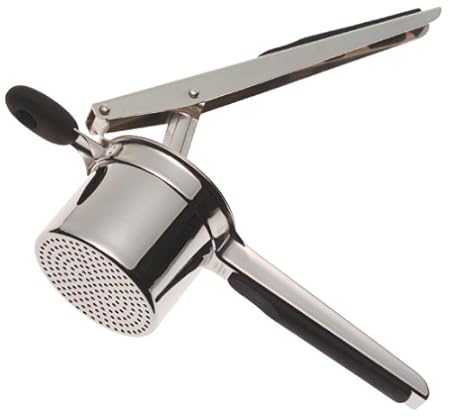


Before I got that though, I would mash bananas by putting them in a ziploc bag, closing it, and mushing them that way.  The ricer is just a little more fun though. :)

Recipe Source: http://www.catcancook.com/awesome-banana-muffin-recipe/

Banana Muffins
Printable version here

3 or 4 large bananas, mashed
1/2 cup white sugar
1 slightly beaten egg
1/3 cup melted butter
1 tsp. baking soda
1 tsp. baking powder
1/2 tsp. salt
1 1/2 cups flour
1/3 cup mini chocolate chips and/or chopped walnuts (optional)

1. Mix the mashed banana, sugar, egg and butter together. Set aside. In a separate bowl, mix together baking soda, baking powder, salt and flour.  Mix wet and dry ingredients all together. Stir in chocolate chips and/or nuts. Pour into greased or paper-lined muffin tins. (I use a large cookie scoop for this.)

2. Bake at 350º for approximately 20 minutes.  Remove to a wire rack to cool.  Enjoy!

Yield: 12 muffins

Why I love it? They are simple, use ingredients I almost always have, and are so light & delicious!!  I would much rather give the kids one of these as a snack than something packaged.  It's just so good knowing exactly what they're eating! :-)

Wednesday, October 3, 2012

Baked Egg Patties


I found this recipe on Pinterest recently.  Some things on that site seem too good to be true, but I was willing to spend $6 on a jumbo muffin tin to try it out.  Well, I am thoroughly impressed!!  Look how simple it is!


Bake for 20 minutes @ 325º, and you get this!


Presto!  It makes for the easiest breakfast sandwiches ever!  I also tried this recently with only egg whites, and I'm pleased to say it works just as well!  You use 2 egg whites per muffin cup. (I had leftover egg whites to use up after making this delicious homemade egg nog.)

Recipe source: http://www.theyummylife.com/Egg_McMuffin 

Baked Egg Patties
Printable version here

6 large eggs*
Salt & pepper

1. Preheat oven to 325º.  Spray a jumbo muffin pan with nonstick spray.  Break one egg into each muffin well; poke yolk to crack it open.  Sprinkle with salt & pepper.

2. Bake for 20 minutes, or until desired doneness.  (At 20 minutes the yolks & whites are firm) Serve or refrigerate in a covered container.  Reheat in microwave for about 20 seconds.

*You can either use 6 whole eggs, or 12 egg whites.  If using only whites, whisk gently in a medium bowl, then pour 1/4 cup whites into each muffin cup (or break eggs open over muffin cups, using 2 eggs per cup). Baking time remains the same.

Why I love it? I have tried for YEARS to cook round egg patties like this.  Nothing has turned out anywhere near this well, or as easy!  This would be perfect for serving eggs to a crowd, or you could make a batch and keep them in the refrigerator for a week's worth of easy breakfasts.

Thursday, September 20, 2012

Simple Yeast Rolls


These were the first homemade rolls I ever made.  I forget where I got the recipe, but it seemed easy enough- no kneading, and no special equipment.  Just this intimidating ingredient called... yeast!
Yeast is not hard to use, you just have to remember a few things about it.  There are two different kinds- regular (called active dry yeast) and instant, a.k.a. rapid rise.  I always use the rapid rise kind; it's less finicky.  It can be added directly to the rest of the ingredients, whereas regular/active dry yeast must first be "proofed" by adding it to warm water and letting it sit for a few minutes.  This is the kind I normally buy (it's a 1 pound package):

 The other thing to remember about yeast is that since it is an actual living organism, it will die if added to liquid that is too hot.  You want the liquid warm enough to help activate the yeast (if the water is cold, the dough will rise very slowly) but not too hot- around 120-130º is ideal.  If you don't have a thermometer, that temperature feels very warm but not hot.

Now I bake with yeast all the time.  I make bread, breadsticks, pizza dough, cinnamon rolls, artisan-type bread, you name it!  If you have any yeast questions, just ask!  I'm pretty comfortable working with it.

After stirring the dough, it's a sticky mess, but that's okay!  Just cover the bowl with plastic wrap and let rise for 30 minutes.


Cutting the dough into 12 pieces


The dough has been rolled into balls; now they are sitting on the parchment, ready for the 2nd rise


Simple Yeast Rolls
Printable version here

2/3 cup water
3 tbsp. butter
2 tbsp. sugar
1 tsp. salt
1 small package instant yeast (2 1/4 tsp.)
1 egg, beaten
2 cups flour (such as 1 c. each white & wheat)

1. In a medium mixing bowl, microwave water until it boils.  Add butter, sugar, and salt, and whisk to combine.  When butter has melted and mixture has cooled slightly (to around 120º), add yeast and egg; stir. 

2. Add flour to mixture and stir until combined.  Cover bowl with plastic wrap.  Let rise in a warm place* (or on countertop) for 30 minutes.  Roll out dough in a circle on a floured surface.  Cut into 12 wedges, and roll into balls.  (If dough is too sticky to handle, sprinkle a little more flour on it.) Place on a greased (or parchment-lined) baking sheet.  Spray a piece of plastic wrap with nonstick spray and loosely cover the dough with it.  Let rise another 30 minutes.  While rising, preheat oven to 400º.

3. Bake for 11-12 minutes or until lightly browned.  If desired, rub butter over the top of baked rolls.

* One way to make a warm rising spot is to turn on your oven for 1-2 minutes, then turn it off.  Let the dough rise in here.

Note- it takes about 1 hour 40 minutes to make these, start to finish.

Why I love it? It is a good way to practice working with yeast- it doesn't require the kneading that most yeast recipes require.  The ingredients are simple, and I like that there are no preservatives or any other strange ingredients in it.  We like having these with dinner, and the next day they're still good for things like making little sandwiches. 

Friday, August 31, 2012

Snickerdoodle Bars


I love making bar cookies whenever I need to make dessert for a crowd.  I love to bake, but I also value my time!  Bar cookies/brownies are just easier and quicker than making individual desserts.  I have made these several times now for church functions, and each time people ask me for the recipe!  These are pretty rich (possibly because of the 2 sticks of butter and 2 cups of brown sugar...) so be sure to cut them in small pieces!

TIP- Whenever I bake a type of bar, I always line the pan with foil.  Not only does this make for easier clean-up, but it makes it SO much easier to remove the bars from the pan, and to cut them cleanly.  This is how I do it:

1. Turn the baking dish upside-down, tear off a piece of foil that's bigger than the dish, and mold the foil to the edges of the pan.


2. Turn the baking dish over, then place your molded piece of foil inside it.  It should be easy to press the foil into the pan now.  Lightly spray with nonstick spray before adding batter.

This is the cinnamon mixture that you sprinkle on top.  This cinnamon is from Costco, and it's delicious!


My little helper, Megan!  This is just before baking the bars.


Recipe source: http://www.browneyedbaker.com/2010/07/09/snickerdoodle-blondies/

Snickerdoodle Bars
Printable version here

2 2/3 cups all-purpose flour
2 tsp. baking powder
1 tsp. salt
1 tsp. cinnamon
1/4 tsp. grated nutmeg (optional)
2 cups packed brown sugar (14 oz.)
2 sticks (8 oz.) unsalted butter, at room temperature
2 eggs
1 tbsp. vanilla extract
2 tbsp. granulated sugar
2 tsp. cinnamon

1. Preheat the oven to 350º.  Line a 9x13-inch baking pan with foil (or grease the pan); set aside.

2. Whisk the flour, baking powder, salt, cinnamon, and nutmeg in a medium bowl; set aside.

3.  Beat together the butter and brown sugar on medium speed until light and fluffy, about 5 minutes.  Add the eggs one at a time, and then the vanilla.  Beat, scraping the bowl, until thoroughly combined.  On low speed, gradually add the flour mixture until just combined.  Give the dough a final stir with a spatula or wooden spoon to make sure the flour is incorporated.

4. Spread the dough evenly into the pan- using an offset spatula will help, as it's a thick batter.  Combine the granulated sugar and 2 tsp. cinnamon in a small bowl and sprinkle evenly over the top of the batter.

Bake for 30 minutes or until the surface springs back when gently pressed.  Cool completely in pan before cutting.  Cut into small pieces.  Store in an airtight container at room temperature. (May also be frozen for 1-2 months.)

Why I love it?  I have always loved snickerdoodles, and this is an even faster way to make them!  They have a healthy dose of cinnamon in them, but not too much.  I like that they make a lot and they freeze well!