Just a quick post to wish everyone a Merry Christmas (last week) and a Happy New Year! I have enjoyed sharing recipes for a whole year, and look forward to sharing more in 2012.
On a kind of Christmasy note, here's what I brought for Christmas (along with scalloped potatoes)- this Rosemary Potato Olive Oil Bread. I just love it!!
Here are two of the Christmas gifts I requested, and my lovely husband bought for me. I know he doesn't mind spending money on cooking stuff for me, since I make so much good food for him! :)
This is my 4th (and probably last!) Cook's Illustrated cookbook. This one is 1000 pages long, and should keep me busy for years!
And then this beauty, a 6 quart Lodge dutch oven. Cast iron has really grown on me, and I'm excited to add this piece to my collection! As we speak, I'm braising a chicken breast in it. I've also used it for cooking chili. It's a really good size, and one unique thing about it is that it has a white interior- which makes it easy to see inside! The price is amazing, too, for what you get. A nice strong pot that should last years, and for under $50.
Anyway, thanks for reading!
Friday, December 30, 2011
Herb Focaccia Bread
I found this recipe a few months ago on my favorite blog (here), and it has become a favorite at our house! It has turned out well every time I've made it. We've had it as a side for Italian food, roast chicken, and more.
Brushing with olive oil before baking
All done & golden brown!
Herb Focaccia Bread
Printable version here
2 3/4 cups all-purpose flour
1 tsp. salt
1 tsp. sugar
2 1/2 tsp. instant yeast (or 1 packet)
1 large clove garlic, finely minced
3/4 tsp. dried rosemary (or 1 tbsp. fresh, chopped)
1/2 tsp. dried thyme (or 1/2 tbsp. fresh, chopped)
1/2 tsp. dried oregano
1/2 tsp. dried basil
1 tbsp. olive oil (plus more for topping)
1 cup warm water
1. In a large bowl (or the bowl of a stand mixer fitted with the paddle attachment), mix the flour, salt, sugar and yeast. Mix in the herbs. Add the garlic, water and olive oil and mix until the dough comes together. Switch to the dough hook if using, and knead for 4-6 minutes (adding additional flour only if necessary- the dough will get less sticky as it kneads). The dough should be soft and pliable but not overly stiff. Likewise, it shouldn't leave a lot of sticky dough residue on your fingers. The goal is a soft, supple dough.
2. Cover the bowl with lightly greased plastic wrap and let the dough rise for 30 minutes, until it is puffy. Gently deflate dough and allow to rest for 5 minutes.
3. Preheat the oven to 425º. Lightly grease a large, rimmed baking sheet and with your hands, spread the dough out into roughly an 8x10 inch rectangle. Use your knuckles or fingertips to make indentations over the dough, about every 1/2 inch. Lightly brush dough's surface with olive oil and bake for 15-20 minutes, until golden brown.
4. Immediately after removing from the oven, brush 1 more tablespoon olive oil over the bread, and sprinkle with about 1/2 tsp. salt. Cut into pieces and serve. Best when eaten the day it's made.
Why I love it? Mainly because it is delicious- the herbs and olive oil are fantastic together! It's a nice soft bread, and the steps are pretty simple. Plus, you just can't buy fresh, hot bread like this from a store!
Thursday, December 22, 2011
Christmas Goodies- Caramel Corn & Snickerdoodles
This week I made goodies for Dave to take to work, and his coworkers are requesting the recipes! One of the things in the bag was a pretzel wreath, which is posted below. The others were caramel corn and snickerdoodle cookies. The caramel corn was based off a recipe I found at allrecipes.com, and the cookies were from my Baking Illustrated cook book.
Caramel Corn
Printable version here
7 quarts plain popcorn (made from about 1 cup kernels)
1 cup (2 sticks) unsalted butter
1/2 cup light corn syrup
2 cups (14 oz.) light brown sugar
1 tsp. kosher salt (or 1/2 tsp. table salt)
1/2 tsp. baking soda
1 1/2 tsp. vanilla extract
1. Pop popcorn using your preferred method (here is mine). Place the popcorn in a large roasting pan (or two other large baking pans) and keep warm in a 225º oven.
2. Next, to make the caramel, melt the butter in a 3-quart saucepan set over medium heat. Once the butter is melted, mix in the corn syrup, brown sugar and salt. Increase the heat to medium-high and bring the mixture to a boil. Set a timer for 5 minutes, and keep the butter mixture at a boil, reducing the heat if necessary.
3. Remove the mixture from heat and stir in the baking soda and vanilla extract (this will make the mixture bubble up a little, so keep your hands away). Remove popcorn from the oven, and pour the caramel sauce over it, tossing to coat. Bake for 45 minutes to 1 hour (I did an hour), stirring every 15 minutes. The popcorn is done when it is completely crispy when you take a bite.
4. Line the countertop with waxed paper (I used one sheet of waxed paper, plus my pastry mat). Dump the corn out onto the paper and separate the pieces. Allow to cool completely, then store in airtight containers and/or resealable bags. Can be made several days in advance.
Snickerdoodles
Printable version here
2 1/4 cups (11 1/4 oz.) all-purpose flour
2 tsp. cream of tartar
1 tsp. baking soda
1/2 tsp. salt
12 tbsp. (1 1/2 sticks) unsalted butter, softened but still cool
1/4 cup vegetable shortening
1 1/2 cups (10 1/2 oz.) granulated sugar, plus 3 tbsp. for rolling dough
2 large eggs
1 tbsp. ground cinnamon for rolling dough
1. Preheat oven to 400º and line 2 large baking sheets with parchment paper or spray them with nonstick cooking spray. (I also lined one with plain foil, and it worked fine.)
2. Whisk the flour, cream of tartar, baking soda and salt together in a medium bowl; set aside.
3. With a mixer, cream the butter, shortening, and 1 1/2 cups sugar at medium speed until combined, 1 to 1 1/2 minutes. Scrape down the sides of the bowl with a rubber spatula. Add the eggs and beat until combined, about 30 seconds.
4. Add the dry ingredients and beat at low speed until just combined, about 20 seconds.
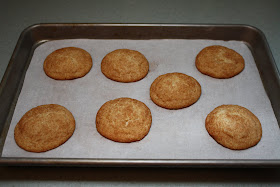
5. Mix 3 tbsp. sugar and 1 tbsp. cinnamon in a shallow bowl. Scoop the dough into balls, about 1 rounded tablespoon in size (I used a small cookie scoop) and round with your hands. Then roll each ball in the cinnamon/sugar mixture and place it on the baking sheet, spacing them about 2 inches apart. (Note- I found it easiest to roll a sheet or two full of the plain dough balls, then roll them all in cinnamon one at a time. That way my hands weren't getting quite so messy. Also, be sure to not place them too close on the baking sheet or they will run into each other, trust me! My medium baking sheet normally makes 12 cookies, and I could do 7 of these, and my large one that normally bakes 15 could do 9. I found out that chilling the dough beforehand makes them spread less, but either way is fine.)
6. Bake until the edges of the cookies are beginning to set and the centers are soft and puffy, 9 to 11 minutes (I do 9 1/2 minutes). Let the cookies cool on the baking sheets 2-3 minutes before transferring them to a wire rack. Cool completely, then store in an airtight container. Yield: about 4 dozen cookies.
Thursday, December 15, 2011
Pretzel Wreaths
I got this idea a few years ago when I was a Pampered Chef consultant. It looks neat and is SO easy! Which is good, because this time of the year, who has tons of time on their hands? Not me!
All it is is two staggered layers of 5 dipped pretzels, with sprinkles on top
You can also drizzle them with chocolate. This is how I packaged them to give away:
Pretzel Wreaths
Printable version here
Candy melts or almond bark*
Mini pretzels (10 per wreath)
Sprinkles
1. Place candy melts or almond bark in a microwave-safe dish; microwave according to package directions until melted & smooth.
2. Dip rounded bottoms of 5 miniature pretzels, one at a time, into bark; shake off excess. Lay pretzels onto parchment (or waxed) paper in a circular pattern with sides touching and rounded sides toward center.
3. Repeat with 5 additional pretzels, placing directly on top of first circle in a staggered circular pattern. Decorate wreath as desired. Let stand until set.
Store at room temperature in an airtight container up to 1 week. Do not refrigerate or freeze wreaths or pretzels will lose crispness.
*The amount of candy melts depends on how many wreaths you want to make. You can also substitute regular chocolate chips, melted and mixed with a little vegetable shortening (the ratio I found online was 8 oz. chips to 1 tbsp. shortening).
Why I love it? They are so quick to make- especially if you make them on a lined cookie sheet, and put it in the fridge for a few minutes. I think one of them makes a nice little gift for the holidays.
Tuesday, December 6, 2011
Rosemary Potato Olive Oil Bread
I tried a new recipe at dinnertime last night. For some reason this sounded really good- Rosemary Potato Olive Oil Bread. I've never had it before, but I was pretty sure it would be good! I searched Google and found this recipe here- it's a blog written by someone named Megan.
(Side note- here's my cutie Megan wearing an apron I just made her. She'll be 3 next week!)
Anyway, this bread wasn't hard to make, and it turned out great! All five of us devoured it! I'm going to write the recipe exactly as I made it, but you can also look at the post I found it from, or this site (the original source for the recipe) for more explanation.
*I just made it again, and found two things to add. One is the time it takes to make this- not counting the time to make the mashed potato, it takes 2 1/2 hours start to finish. Plus, you would need to add about 1/2 hour of cooling time. I thought I started this early enough in the afternoon, but it ended up being ready a little too late for dinner. So for me, I'd want to start it around 2:30 to have ready for dinner at 5:30.
Also, I found that it is still good the next day. I didn't mean to do this, but I baked it on Friday and we ate it for dinner on Saturday. After it cooled, I stored it in a paper bag (I'm sure plastic would be fine too). Then when I wanted to eat it the next day, I heated in on the oven rack at 300 degrees for maybe 10 minutes. It tasted exactly like it did the first time! I didn't mean to do it that way, but it's good to know! :) The leftovers also make great toast!
Mashed potato & olive oil mixture
Rosemary Potato Olive Oil Bread
Printable version here
1/2 cup mashed up potato
2 tbsp. olive oil
1 1/3 cup all-purpose flour (or bread flour)
2/3 cup wheat flour
1 tsp. salt
1 1/8 tsp. instant dry yeast (half a package)
1 tsp. dried rosemary, chopped
1/2 cup potato water (or regular water), warm
1. In a small bowl, mix together the potatoes and olive oil until smooth. Set aside.
2. In the bowl of a stand mixer (or a large bowl), combine all dry ingredients. Next add the potato mixture and the warm water; stir. Knead on speed 2 (or by hand) for 8 minutes, or until smooth and elastic, adding small amounts of water or flour if needed to form a soft dough (mine didn't need any extra).
3. Place dough in a large, lightly oiled bowl and cover with a dishtowel. Let rise for 1 hour or until doubled in size. (I turn my oven on for a minute or two while the dough is kneading, then I have a slightly warm place for the dough to rise in.)
4. Turn dough out onto a lightly floured surface and knead a few times. Form into a ball, pulling the dough to the underside of the ball to help form a smooth top. Pinch the dough closed on the bottom. Place the dough on a lightly greased baking sheet & sprinkle lightly with flour. Cover with a towel and let rise for 30 minutes, or until doubled in size.
5. Toward the end of the rising time, preheat the oven to 400º. If the dough was in a bowl, flip it right-side up on the baking sheet, greased or lined with parchment. Using a sharp knife, make 3-4 diagonal slits in the bread to make a criss-cross pattern (or two slits to make an X). Bake for 30-35 minutes or until golden brown. Transfer to a wire rack to cool. Let cool (at least slightly) before slicing.
Yield: One medium loaf
- For the potato, I used one Yukon gold. I peeled & cubed it, and cooked it in a medium saucepan with enough water to cover it. Once it was soft, I drained it, saving the liquid. Then I mashed the potato until it was completely smooth.
- You could use all white flour, I just chose to use part white/part wheat.
- Feel free to use fresh rosemary if you have it.
- You can also double the ingredients to make a larger loaf. When I did that, I made it in a rounded rectangular shape with 3 X's on top.